Here’s a new blog, replacing my old one at wordpress.com. I promise this has nothing to do with the recent
WordPress drama; I have no horse in that race (neither side looks good), and I abandoned the old blog years ago due
to my own dislike of WordPress and wordpress.com.
Back then I spent a lot of time trying a few SSGs that seemed to suit
my preferences, but didn’t find any that I really liked. At the time I already considered writing my own generator
but the project didn’t get far. Now that I’m finally making the move happen, I had another look at some of the
options and tried a couple of others, and still none of them made me happy (Astro was close). There’s probably the
right SSG for me out there, but I’m not going to spend months trying
all of them.
So I wrote my own static site generator. I have no ambitions for this to become a generic tool, so that saves me
the pressure of making the code elegant. The code is written in TypeScript, with JSX for templating and Markdown
for writing content. Rather than going the usual route of reusing the JSX runtime from Preact or other similar
projects, I wrote my own JSX runtime from scratch just to learn how.
The biggest problem with this whole setup is the uncomfortably slow speed. I did a bit of poking around and the
problem comes down to:
Fairly slow startup. I suspect this is because of the compilation from TypeScript+JSX to JavaScript. I
might try a different compiler, or a runtime like Deno or Bun that has direct TypeScript support.
Very slow syntax highlighting. For this one, I guess I can cache the HTML output or change to a less
accurate highlighter.
I’m quite happy with the result so I’m going live with this. There are nice-to-have features that I want like
syndication feed (RSS/Atom) and search, but they will have to come in the future.
I’ll slowly migrate my old WordPress posts here while updating the contents if necessary. I don’t plan to add
comment support to this blog, so I’m thinking of linking to Mastodon, for which I’ve just created an account as
well (see the About page).
Update: After more testing, the highlighter that I thought was better wasn’t actually that good;
I’ve switched to a faster one and now highlighting speed is at a reasonable level, and quality seems fine so far.
Update 2: I’ve added a rather bare-bones Atom feed that doesn’t include the article contents
inline. Some feed readers can automatically download articles as you view them, but unfortunately for many readers
you’ll have to click through to the site.
Make is great, but there are some issues with it that
are probably impossible to fix now. So I’ve been looking for a replacement that I can use for simple task
automation; surely in the 40+ years of Make’s lifetime someone has written something better, right?
These are the notes I made while evaluating the different options that I explored. I’m interested to see if anyone
has comments, corrections, or other suggestions.
Implemented in: Various programming languages (probably mainly C).
Script language: Make (various dialects).
Metaprogramming: Yes (major implementations).
Biggest issue: Stringly typed.
Good old Make. Very nice for all sorts of tasks, until you need to deal with files containing space and/or quote
characters, where things start to go downhill.
This is only mentioned for completion because Ninja is in a completely different ballpark. It’s meant to be a
target language for buildfile generators like CMake and Meson, so by itself it has zero programmability, and you
wouldn’t really want to write it by hand.
This feels like a Make variant with fewer features than most Make implementations. I don’t see this as a practical
choice for any project, at least right now.
I actually really like the idea of Task. For very simple use cases it’s very elegant, because its whole syntax is
just 100% valid YAML with a bit of string templating. The templating sometimes gets in the way, though, because the
use of {{.VAR}} for variables
conflicts with YAML’s
{a: b} map syntax, forcing you to waste one level of string quoting on it.
A bigger flaw is that there’s no easy way to override variables from the command line. I think you can work around
this by jumping through scripting hoops, but then you lose a ton of elegance points.
And the biggest flaw: it’s still stringly typed just like Make, so you’ll have trouble separating strings from
lists.
This looked promising until I noticed that outputs didn’t seem to be tracked anywhere, which means everything gets
rebuilt all the time. Is this really the case or am I missing something?
Grunt’s documentation is rather bad, and the examples they have all throw you in the deep, ugly end. Skimming these
introductory materials, I couldn’t figure out how to write the simplest build file, which seems a bad sign.
Biggest issue: Ruby’s shell module is broken on Windows.
This one looked very promising. I’m not a fan of Ruby, but was willing to put up with it because Rake
seemed to do all I wanted. But then I discovered that Ruby’s most reasonable subprocess handler, the
shell module, breaks on Windows. Without it, you’re back to various
ugly half-baked APIs, each
with their own limitations.
Two competing Python-based build systems. These seem too complicated for my use cases. I think making them suit
simple tasks would be a significant undertaking. Or perhaps I’m just missing a documentation that is not mainly
targeted at people trying to create a build pipeline for their C projects.
With this one you end up with lots of boilerplate because rather than writing tasks, you’re writing
task creators. It makes sense, but it feels like doing things at a too-low level when you want it to be a
simple Make alternative.
The author of doit
suggests several high-level interfaces
that can be implemented on top of doit. They do limit what you can do, but you can always write normal doit task
creators in addition to the simplified versions. I think this is a reasonable compromise and I particularly like
the decorator version.
The only remaining problem, then, is that Python’s subprocess handling is very cumbersome. There are two libraries
I know of that can rectify this: sh and Plumbum. sh, in my opinion, is
not suitable for use in a Make replacement use case. The way it does piping by default is not in line with what we
expect, coming from Make. Plumbum is not perfect but better (you still
have to end everything with .run_fg() or the magical & FG).
A quirk of doit is that it creates a cache file (or files) alongside your build file. Depending on the exact
database backend used, it can create up to three files, which I’d say is not ideal.
I have for now settled on doit + Plumbum with around 100 lines of support code. I’m not fully happy with this, and
I’m not sure it can cover all my use cases, but I think it’s time for me to put my ideas and investigations out
there and seek comments.
Rake is almost what I need, if not for what I believe is a bug in Ruby’s standard library. But even if it’s fixed,
I’d prefer to stick with a Python-based solution if possible.
This post explores one of the capabilities of the PyICU library, namely its text transformation module.
Specifically, we’ll look at the simplest use case: transliterating text into Latin script.
Say you are given a list of phrases, names, titles, whatever, in a writing system that you’re not familiar with.
You want to be able to differentiate the items, but this is hard when you can’t read what they say. Well, let’s
turn them into Latin characters (which, assuming you’re reading this in English, you are able to read)!
There we go. Even though you probably still can’t pronounce these names correctly, at least they’re hopefully
easier to recognise because they are now in a script that you are more used to reading (unless you’re Greek, of
course).
"Any-Latin; Title" means we want to transliterate from any script to Latin, then convert it to title
case. If that’s too simple, the
ICU documentation has the gory details of all
the supported transforms.
As previously aluded to, do not rely on the output as pronunciation guide unless you know what you’re doing. For
example, the Korean character 꽃 is transliterated by ICU as kkoch to keep it reversible; that’s not how
the word is normally romanised, and if you try to pronounce it like that nobody will understand you.
Another issue is that the transliteration of Han characters (shared between Chinese, Japanese, and Korean) uses
Chinese Pinyin, and thus may not resemble the Japanese and Korean romanisations at all. Considering that Japanese
writing makes extensive use of these characters, using ICU to transliterate Japanese texts may be a bad idea
depending on your use case.
>>> tr("日本国")# "Nippon-koku" in Japanese, meaning "Japan"'Rì Běn Guó'
Oops, that could start an Internet war. Use a different library if you need to properly deal with Japanese text.
Another unfortunate thing with ICU is that there are still scripts that it doesn’t support at all. For example, it
can’t transliterate to/from Javanese.
GitLab provides a continuous integration service, which is pretty nice for building, testing, and packaging your
software and having all the UI integrated in GitLab. If you’re just using the free GitLab.com hosting, you get to
utilise their Docker-based runner. (If your build process requires a non-Linux OS you’ll have to provide your own
runner.)
Getting a basic build up and running is pretty simple. For example, here’s one job named test that only
runs make check:
# .gitlab-ci.ymltest:script:- make check
If your test suite can measure code coverage, GitLab can also show it in the UI. At the moment this feature is
rather rudimentary and requires you to go to the project settings and enter a regular expression to find the
coverage amount in the build output.
The following is an example that works with coverage.py when you only have a single Python file. I
haven’t tried it with multiple files; it may require a wrapper script that calculates the total coverage amount.
# .gitlab-ci.ymltest:image: python:3-alpine
script:- pip install coverage
- coverage run foo.py
- coverage report -m
# Regex that matches the coverage amount:# ^\S+\.py\s+\d+\s+\d+\s+(\d+\%)
A few lessons learnt from setting up test hooks for a small Python app:
There is no way to test changes to your build script without pushing a commit. And then the build results will
stay in your project page forever with no way to clean up the irrelevant ones.
You can run builds locally with gitlab-runner, e.g. gitlab-runner exec shell test to
run the test job on the local shell (replace shell with docker to use
Docker). (Thanks Evan Felix for the info about gitlab-runner.)
GitLab.com’s default Docker image (ruby:2.1 at the time of writing) is really fast to spin up,
possibly because it’s cached. However, you should still explicitly name a Docker image in case the default
changes.
Installing packages is slower than downloading a Docker image. It’s not worth going out of your way to use the
default image if you then have to call apt-get. See if your compiler has an official Docker image
that has all the packages you need (please don’t run Docker images by random people). That said, we’re talking
about differences of about ten seconds, so just choose the method that is most convenient.
The ruby:2.1 image has Python 2 but not Python 3.
The official Python repository on Docker Hub lists a number of
Alpine-based images. As you would expect, these are smaller and slightly faster to download than the other
(Debian-based) images.
The coverage regex requires the percent sign to be escaped (\%).
One of the niftiest legacies of the old Amarok music player (version 1) is the
Moodbar visualisation method. The idea behind
it is simple: take the source audio signal, analyse it, and create a colourful representation of the sound as a
timeline.
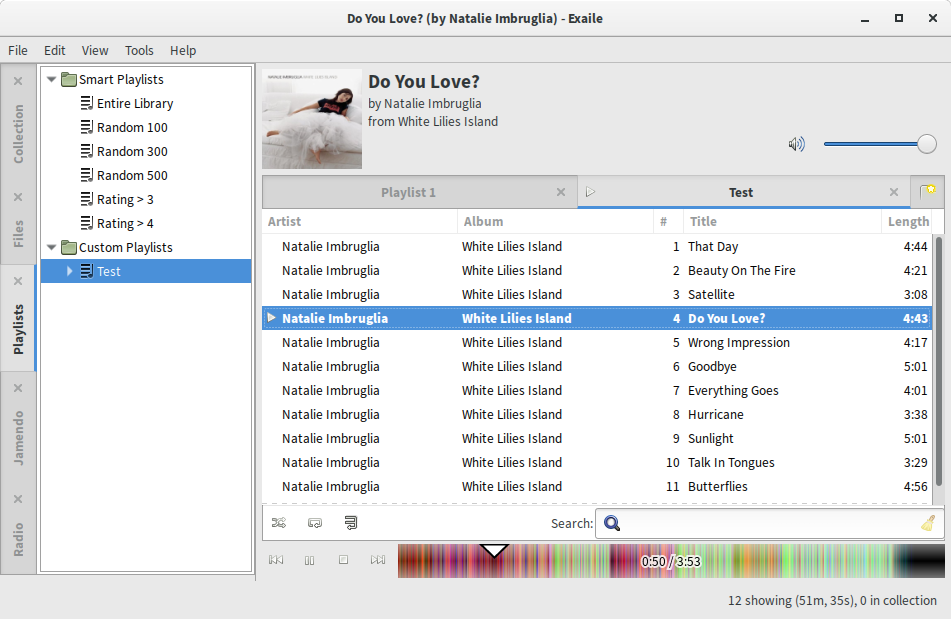
Exaile with Moodbar replacing the standard seek bar
Back in 2009, Solyanov Michael created an external plugin to add Moodbar support to Exaile, and at some point it
was imported into the Exaile tree. Now that we’re upgrading Exaile to GTK+ 3, I have been rewriting the plugin’s UI
code from using GDK drawing functions—which don’t exist anymore—to using
Cairo. The above screenshot shows a sneak peek of how the new UI
currently looks like.
Moodbar is explained in a 2005 paper by Gavin Wood and Simon
O’Keefe which presents a number of algorithms for visualising audio signals. Specifically, the Bandwise Spectral
Magnitude method is the one implemented as Moodbar.
Long story short, for each point in the timeline, the red channel represents low frequencies, green represents mid
frequencies, and blue represents high frequencies. In practice, however, it is often difficult to imagine what an
audio segment will sound like just based on its colour. The only thing you can pretty accurately guess is the audio
level based on colour intensity (bright=loud, dark=quiet).
I’ve prepared a few
Moodbar examples with playable audio
for you to see this in action. Some of the samples (Hypocrisy, What Is Love) are pretty good and show
all sorts of colours differentiating song sections. Some are less exciting, either because the song mostly uses a
single instrument (Ups and Downs) or because the song is relatively monotonous (Max).
To my knowledge, there are only three actively-developed media players with Moodbar support, all of which are based
on Amarok 1 to some degree: Exaile, Amarok 2, and Clementine. Ironically, Amarok 2’s Moodbar support is the least
integrated; you need to manually scan your files, whereas Exaile and Clementine do this for you as they play
individual files.
Currently Exaile and Amarok 2 still rely on the old, GStreamer 0.10-based Moodbar program. Clementine seems to have
integrated Moodbar into their own code and is using it as a library. Their latest release is still using GStreamer
0.10, but their development tree already contains a GStreamer 1.x-based Moodbar.
Right now we are focusing on finishing the GTK+ 3 port of Exaile, which includes getting the Moodbar plugin to a
reasonable state. The basic Moodbar functionality is ready; I just have to implement a fallback UI for tracks that
have not been or cannot be scanned for whatever reason.
Other Moodbar-related tasks on my radar (read: may or may not happen):
Steal split Clementine’s new Moodbar code into a separate library so that Exaile and other media
players can make use of it. I have the code sitting ready to be published, but it still needs more testing,
especially since I’ve just found out that it produces different output to the original Moodbar program. (Update:
This is done.)
Add some of the old features that don’t make the cut to the GTK+ 3 port (darken should be doable;
waveform will be tricky, given the way the new drawing is done). (Update: This is also done.)